완성한 포켓몬도감 배포 주소이다.
완성된 포켓몬도감
01. 타입 스크립트를 사용하기 위한 준비하기
typescript 설치
npm install -D typescript @types/react @types/react-domvite.config.js -> vite.config.ts 확장자 변경
tsconfig.json, tsconfig.node.json, vite-env.d.ts(/src/) 가져오기
vite로 typescript + 리액트 프로젝트 생성하면 기본으로 생성되는 파일을 가져온다.main.tsx 확장자 변경
- index.html에서 main.tsx로 변경
ReactDOM.createRoot(document.getElementById('root') as HTMLElement).render( <App /> )
root에 as HTMLElement를 추가
- allowJs true설정
import에러는 allowJS 설정을 해준다.
tsconfig.json에서"allowJs": true,추가
02. 메인 페이지 타입 스크립트로 변경하기
- 파일 확장자 tsx로 변경
- 타입 폴더 생성
- 포켓몬 데이터를 위한 interface 생성
export interface PokemonData { conunt: number; next: string | null; previous: string | null; results: PokemonNameAndUrl[]; }
export interface PokemonNameAndUrl {
name: string;
url: string;
}
4. 메인페이지에 타입 주기 * state ```ts // 모든 포켓몬 데이터를 가지고 있는 State const [allPokemons, setAllPokemons] = useState<PokemonNameAndUrl[]>([]); // 실제로 리스트로 보여주는 포켓몬 데이터를 가지고 있는 State const [displayedPokemons, setDisplayedPokemons] = useState<PokemonNameAndUrl[]>([]);
함수 props
const filterDisplayedPokemonData = ( allPokemonsData: PokemonNameAndUrl[], displayedPokemons: PokemonNameAndUrl[] = [] ) => {...} axios.get(url)
const response = await axios.get<PokemonData>(url);map()
displayedPokemons.map(({ url, name }: PokemonNameAndUrl, index) => ( <PokeCard key={index} url={url} name={name} /> ))
03. AutoComplete 컴포넌트를 타입스크립트로 변경하기
- 확장자변경
- AutoComplete props 타입지정
React Typescript Cheatsheet
여기에 각종 typescript작성법이 있는데 props 타입지정 관련 팁을 찾을 수 있다.
AutoComplete에서 props로 받는건 모든포켓몬정보, setState함수인데
setState: React.Dispatch<React.SetStateAction<number>>;
이렇게 작성가능하다는것을 참고하여 다음과같이 작성.
interface AutoCompleteProps { allPokemons: PokemonNameAndUrl[]; setDisplayedPokemons: React.Dispatch<React.SetStateAction<PokemonNameAndUrl[]>>; }
setDisplayedPokemons 정의된곳 보면const [displayedPokemons, setDisplayedPokemons] = useState<PokemonNameAndUrl[]>([]);
타입이 <PokemonNameAndUrl[]>인것 확인
- 각 함수 props type 정의
(input: string)(e: React.FormEvent<HTMLFormElement>)
04. PokeCard 컴포넌트를 타입스크립트로 변경하기
- tsx
- props 타입지정
({ url, name }: PokemonNameAndUrl) - pokemon useState 타입지정
const [pokemon, setPokemon] = useState<PokeData>(); - formatPokeData에서 params 타입지정
콘솔에 찍어서 확인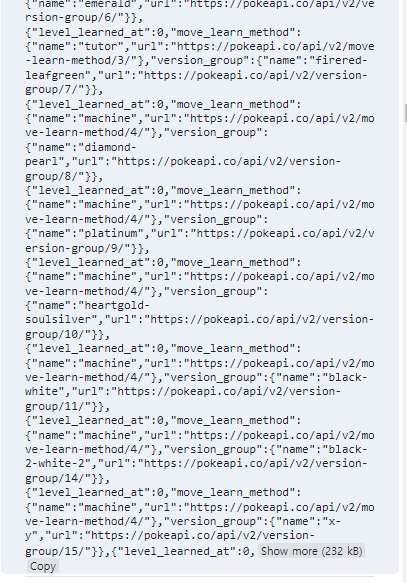
이렇게 많은것을 타입 다 주기보단
변환하는 사이트가 있다.
타입변환사이트 quicktype
params를 먼저 stringify한다음 복사한다.console.log(JSON.stringify(params))
결과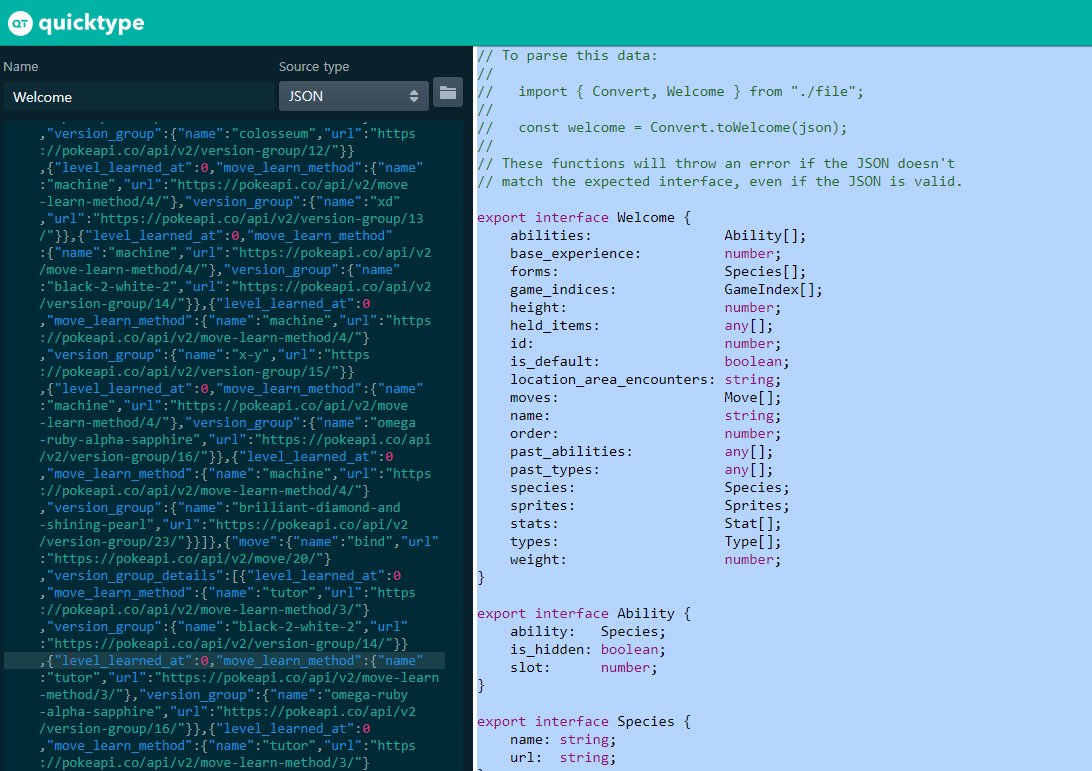
결과를 복사하고 types폴더에 PokemonDetail.ts파일 생성후 붙여넣어준다.
처음 인터페이스는 기본적으로 Welcome이라 되어있는데 이부분은 수정해서 사용하면된다.export interface Welcome {}export interface PokemonDetail {}
돌아와서 params에 타입 지정까지 완료해준다.const formatPokeData = (params: PokemonDetail) => {...}
- LazyImage 컴포넌트 타입추가
interface LazyImageProps { src: string; alt: string; } const LazyImage = ({ src, alt }: LazyImageProps) => { const [isLoading, setIsLoading] = useState<boolean>(true); const [opacity, setOpacity] = useState<string>("opacity-0"); ...
05. 상세 페이지 타입 스크립트로 변경하기
가져온 데이터의 타입 인터페이스 생성을 해주자
formattedPokemonData
formattedPokemonData를 JSON.stringify해서 콘솔에 찍고 복사-> quicktype에서 인터페이스 생성- FormattedPokemonData.ts 파일에 인터페이스 붙여넣기
- next와 previous에 undefined타입 추가
맨 처음 데이터와 마지막 데이터에는 next나 previous가 없을수 있으므로 undefined를 추가한다.const formattedPokemonData = { id, name, weight: weight / 10, height: height / 10, previous: nextAndPreviousPokemon.previous, next: nextAndPreviousPokemon.next, abilities: formatAbilities(abilities), stats: formatPokemonStats(stats), DamageRelations, types: types.map((type) => type.type.name), sprites: formatPokemonSprites(sprites), description: await getPokemonDescription(id), }; // console.log(JSON.stringify(formattedPokemonData));
PokemonDescription
getPokemonDescription 메서드에서 pokemonSpecies 콘솔에 찍고 interface생성
const getPokemonDescription = async (id) => { const url = `https://pokeapi.co/api/v2/pokemon-species/${id}/`; const {data: pokemonSpecies} = await axios.get(url); // console.log(JSON.stringify(pokemonSpecies)); // 한국어 description필터링 const descriptions = filterAndFormatDescription(pokemonSpecies.flavor_text_entries); return descriptions[Math.floor(Math.random() * descriptions.length)]; }
DamageRelations
const DamageRelations = await Promise.all( // 비동기 작업 처리하고 한꺼번에 리턴 types.map(async (i) => { const type = await axios.get(i.type.url); // console.log(JSON.stringify(type.data)) return type.data.damage_relations }) );
data는 항상 가져올때 response안에 data에 있으므로 주의한다!
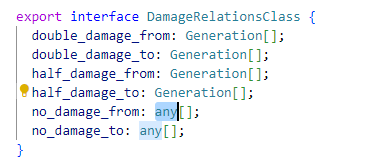
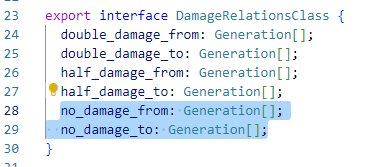
any[]부분이나 다른 타입들은 보고 수정해 사용하면된다...
06. 상세 페이지에 타입 적용하기
useState 타입지정
fetchPokemonData props 타입지정
const fetchPokemonData = async (id: string)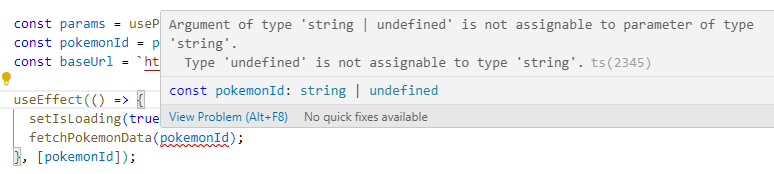
id에 undefined가 올 수 있다고 에러가 뜨는데
이건 params에서 id는 string만 온다고 타입단언을 해준다.const params = useParams() as {id: string}; // 타입단언axios.get 타입지정
const {data: pokemonData} = await axios.get<PokemonDetail>(url);formatPokemonStats
const formatPokemonStats = ([ // stats 배열을 구조분해할당 statHP, statAttack, statDEP, statSATK, statSDEP, statSPD, ]: Stat[]) => [ // 배열 리턴 { name: "Hit Points", baseStat: statHP.base_stat }, { name: "Attack", baseStat: statAttack.base_stat }, { name: "Defense", baseStat: statDEP.base_stat }, { name: "Special Attack", baseStat: statSATK.base_stat }, { name: "Special Defense", baseStat: statSDEP.base_stat }, { name: "Speed", baseStat: statSPD.base_stat }, ]; formatPokemonSprites
const formatPokemonSprites = (sprites: Sprites) => { const newSprites = {...sprites}; // console.log(Object.keys(newSprites)) // string이 아닌 값을 가졌다면 삭제하기(url 있는것만 남기기위해) ((Object.keys(newSprites) as (keyof typeof newSprites)[]).forEach(key => { // newSprites에 키값만 가져옴(오브젝트에 키값만 가져옴) if(typeof newSprites[key] !== 'string') { delete newSprites[key] } })); return Object.values(newSprites) as string[]; // url만 return } 반환타입지정
const filterAndFormatDescription = (flavorText: FlavorTextEntry[]): string [] => {
const getPokemonDescription = async (id: number): Promise<string> => { const url = `https://pokeapi.co/api/v2/pokemon-species/${id}/`; const {data: pokemonSpecies} = await axios.get<PokemonDescription>(url); // 한국어 description필터링 const descriptions = filterAndFormatDescription(pokemonSpecies.flavor_text_entries); return descriptions[Math.floor(Math.random() * descriptions.length)]; }
07. 에셋 컴포넌트들 타입 스크립트로 변경하기
ClassNameProps.ts
export interface ClassNameProps { className?: string; }
props가 있는 에셋컴포넌트에 타입지정export const Pokeball = ({ className: CN = "" }: ClassNameProps) => (...)
08. useRef 타입스크립트
BaseStat 컴포넌트
type guard
const ref = useRef<HTMLDivElement>(null); // ref 속성을 넣은 요소 useEffect(()=> { const setValueStat = ref.current; // 현재 요소에 접근 const calc = valueStat * (100 / 255); if(setValueStat) { // type guard setValueStat.style.width = calc + '%'; // null일때 할수없음 } }, [])
useRef
useRef는 변수로 사용하거나
직접 돔을 조작하기 위해 사용하는 훅이다.
useRef을 클릭해 Type Definition 확인
function useRef<T>(initialValue: T): MutableRefObject<T>;
매개 변수의 타입과 제네릭 타입이 T로 일치(current 프로퍼티 직접 변경가능)
function useRef<T>(initialValue: T | null): RefObject<T>;
매개 변수의 타입이 null을 허용하는 경우 RefObject 반환
(RefObject current는 readonly이므로 프로퍼티 직접 수정 불가능)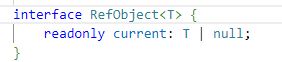
function useRef<T = undefined>(): MutableRefObject<T | undefined>;
타입을 제공하지 않아서 제네릭 타입이 undefined인 경우
(MutableRefObject 반환 => current 직접 변경가능)
- Mutable: 수정할 수 있는, 바꿀 수 있는
소스코드 예시
매개변수 타입 null일때(2번의 예시)
매개변수 타입이 null일때current는 readonly라서 수정이 불가능한데,inputRef.current가 null아닐 때를 type guard로 if절 작성하면
그 안에서는 타입에러가 나지 않고 수정도 된다.
const inputRef= useRef<HTMLInputElement>(null); const handleClick = () => { if(inputRef.current) { // type guard 있을때 current를 바꿔줄 수 있음 inputRef.current.value = ""; } } return ( <> <input ref={inputRef} /> <button onClick={handleClick}>clear</button> </> )
사실 current만 readonly인데 current의 프로퍼티인 value는 수정가능하다.
이건 얕게 동작한다는 의미이고 shallow하다고 표현한다.
매개변수 아무것도 넣지 않았을때const inputRef= useRef<HTMLInputElement>();<input ref={inputRef} />에서 에러가난다.
ref 속성에는 RefObject만 받기때문에!
반드시 null을 넣어주어야한다.
정리
useRef는
- 변수로 사용할때
const localVarRef = useRef<number>(0);
초기값을 제네릭 타입과 같은 타입의 값으로 넣어주기 - 직접 돔을 조작할때
const inputRef = useRef<HTMLInputElement>(null);
초기값을 null로 넣어주기
09. Damage Relations 컴포넌트 타입 스크립트로 변경하기
DamageModal
import { DamageRelations as DamageRelationsProps } from '../types/DamageRelationsOfPokemonTypes'; interface DamageModalProps { damages: DamageRelationsProps[]; setIsModalOpen: React.Dispatch<React.SetStateAction<boolean>>; }
DamageRelations란 컴포넌트가 이미 있으므로 DamageRelationsProps이름으로 import하여 사용한다.
setState prop은 React.Dispatch<React.SetStateAction<타입>>; 으로 지정하면된다.
*useRef()를 사용할때는 위의 설명과 같이,
ref를 사용하는 엘리멘트 타입과 초기값을 null로 지정해야 DOM을 조작할수있다. *
const ref = useRef<HTMLDivElement>(null); return ( ... <div ref={ref} className="modal bg-white rounded-lg w-1/2"> ... );
DamageRelations
1. 컴포넌트 props에 타입
interface DamageModalProps { damages: DamageRelationsProps[]; } const DamageRelations = ({ damages }: DamageModalProps) => {
2. useState에 타입
먼저const [damagePokemonForm, setDamagePokemonForm] = useState();
여기서 damagePokemonForm의 데이터를 콘솔에 찍어봐야한다.
setDamagePokemonForm()할때 안에 데이터를 JSON.stringify로 출력해본다.
그리고 복사해서 마찬가지로 https://app.quicktype.io/에서 interface를 생성해 타입파일을 만든다.
if (arrayDamage.length === 2) { // 합치는 부분 const obj = joinDamageRelations(arrayDamage); setDamagePokemonForm(reduceDuplicateValues(postDamageValue(obj.from))); } else { // console.log("@@@@", JSON.stringify(postDamageValue(arrayDamage[0].from))); // quick type setDamagePokemonForm(postDamageValue(arrayDamage[0].from)); // 첫번째 from }
export interface SeparateDamages { double_damage?: Damage[]; half_damage?: Damage[]; no_damage?: Damage[]; } export interface Damage { damageValue: string; name: string; url: string; }
SeparateDamages inerface를 import해서 쓰면된다.const [damagePokemonForm, setDamagePokemonForm] = useState<SeparateDamages>();
3. 각 함수 props와 리턴타입, key에 타입주기
separateObjectBetweenToAndFrom
const separateObjectBetweenToAndFrom = (damage: DamageRelationsProps): DamageFromAndTo => { const from = filterDamageRelations("_from", damage); const to = filterDamageRelations("_to", damage); // console.log("from", from) // console.log("to", to) return { from, to }; };
객체로 리턴하는데 이부분은 DamageFromAndTo라는 interface를 새로 만들어서 리턴타입에 작성한다.
export interface DamageFromAndTo { // 직접작성 to: SeparateDamages; from: SeparateDamages; }
filterDamageRelations
const filterDamageRelations = (valueFilter: string, damage: DamageRelationsProps) => { const result: SeparateDamages = Object.entries(damage) .filter(([keyName, _]) => { return keyName.includes(valueFilter); // _to와 _from으로 나눔 }) .reduce((acc, [keyName, value]): SeparateDamages => { // reduce는 return해서 acc 메소드에 하나씩 쌓아줌 // console.log(acc, [keyName, value]); // _from, _to 삭제 const keyWithValueFilterRemove = keyName.replace(valueFilter, ""); return (acc = { [keyWithValueFilterRemove]: value, ...acc }); }, {}); // acc의 초기값 빈객체 return result; };
- props 타입주기
- result에
SeparateDamages라고 타입 명시 - filter 안에 인자 안쓰는것
_로 정리 - reduce 리턴타입
- reduce의 acc 초기값 빈객체는 되는데 빈배열은 안되는듯하다. *
postDamageValue
// 2-1. 한개일때: 데미지값 넣어주기 const postDamageValue = (props: SeparateDamages): SeparateDamages => { const result = Object.entries(props) .reduce((acc, [keyName, value]) => { const key = keyName as keyof typeof props; const valueOfKeyName = { double_damage: "2x", half_damage: "1/2x", no_damage: "0x", }; // 데미지값 각 객체마다 넣기 return (acc = { [keyName]: value.map((i: Info[]) => ({ damageValue: valueOfKeyName[key], ...i, })), ...acc, }); }, {}); // console.log(result); return result; };
- props 타입
- 리턴 타입
- reduce의 keyName 타입
const key = keyName as keyof typeof props; - 리턴하는 acc 의 map의 인덱스?
joinDamageRelations
// 2-2. 두개일때: 합치기 const joinDamageRelations = (props: DamageFromAndTo[]): DamageFromAndTo => { return { to: joinObjects(props, "to"), from: joinObjects(props, "from"), }; };
joinObjects
// (합치기 메서드) const joinObjects = (props: DamageFromAndTo[], string: string) => { const key = string as keyof typeof props[0]; const firstArrayValue = props[0][key]; const secondArrayValue = props[1][key]; // firstArrayValue에 secondArrayValue를 합치기 const result = Object.entries(secondArrayValue).reduce( (acc, [keyName, value]: [string, Damage]) => { // console.log("ddd", acc, [keyName, value]); const key = keyName as keyof typeof firstArrayValue; const result = firstArrayValue[key]?.concat(value); // 첫번째 array value에 해당하는 데미지에 합침 return (acc = { [keyName]: result, ...acc }); }, {} ); return result; };
reduceDuplicateValues
// 중복 속성 데미지값 배로 처리 const reduceDuplicateValues = (props: SeparateDamages) => { const duplicateValues = { double_damage: "4x", half_damage: "1/4x", no_damage: "0x", }; // console.log(props) // console.log("object", Object.entries(props)); return Object.entries(props).reduce((acc, [keyName, value]) => { const key = keyName as keyof typeof props; // console.log("키밸류",[keyName, value]); const verifiedValue = filterForUniqueValues(value, duplicateValues[key]); return (acc = { [keyName]: verifiedValue, ...acc, }); }, {}); };
filterForUniqueValues
const filterForUniqueValues = (valueForFiltering: Damage[], damageValue: string) => { const initialArray:Damage[] = []; // 빈배열에 타입주기 return valueForFiltering.reduce((acc, currentValue) => { const { url, name } = currentValue; const filterACC = acc.filter((a) => a.name !== name); return filterACC.length === acc.length ? (acc = [currentValue, ...acc]) // 변경 없으면(중복없으면) currentvalue그대로 넣기 : (acc = [{ damageValue: damageValue, name, url }, ...filterACC]); // 같은것은 데미지밸류 변경 }, initialArray); // 초기값이 빈배열이면 에러가남 };
4. UI 출력부분(return) 타입
<> {Object.entries(damagePokemonForm).map(([keyName, value]: [string, Damage[]]) => { const key = keyName as keyof typeof damagePokemonForm; const valuesOfKeyName = { double_damage: "Weak", half_damage: "Resistant", no_damage: "Immune", }; return ( <div key={key}> <h3 className="capitalize font-medium text-sm md:text-base text-slate-500 text-center"> {valuesOfKeyName[key]} </h3> <div className="flex flex-wrap gap-1 justify-center"> {value.length > 0 ? ( value.map(({ name, url, damageValue }) => ( <Type key={url} type={name} damageValue={damageValue} /> )) ) : ( <Type key={"none"} type={"none"} /> )} </div> </div> ); })} </>
10. 로그인 페이지 및 기타파일 타입 스크립트로 변경하기
1. 로그인페이지 tsx로 변환
2. firebase.js -> firebase.ts
3. App.jsx -> App.tsx
4. NavBar.jsx -> NavBar.tsx
styled-component
TS관련 패키지 추가npm i --save-dev @types/styled-components
show 속성의 타입(단일)
const NavWrapper = styled.nav<{show: boolean}>` position: fixed; top: 0; left:0; right:0; display: flex; justify-content: space-between; align-items: center; padding: 8px 36px; letter-spacing: 16px; z-index: 100; background: ${props => props.show ? "#090b13": "transparent"}; `
여러개 prop일때는 interface를 써서 지정해주면된다.
interface Wapper extends 상속타입 { show: boolean; name: string; } const NavWrapper = styled.nav<Wapper>` position: fixed; top: 0; left:0; `
firebase User 타입
result.user를 찍어서 JSON 데이터로 interface를 생성해줘도되지만
더 정확한건
firebase에서 제공하는 User라는 인터페이스를 사용하면 된다.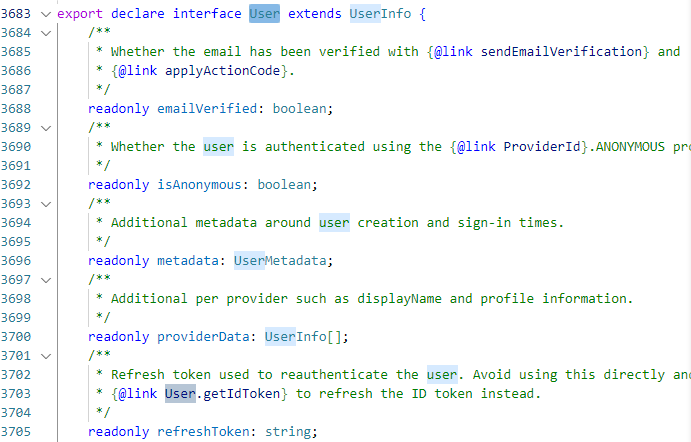
import { User, getAuth, signInWithPopup, GoogleAuthProvider, onAuthStateChanged, signOut } from 'firebase/auth';const [userData, setUserData] = useState<User | {}>(initialUserData);
그런데,
빈객체 {}을 사용하는것보다null을 사용하는것이 더 편하다.
null처리
const initialUserData = userDataFromStorage ? userDataFromStorage : null;- sign-out
const handleSignOut = () => { signOut(auth) .then(() => { setUserData(null); }) .catch(error => { alert(error.massage); }) } - return UI
<SignOut> {userData?.photoURL && ( <UserImg src={userData.photoURL} alt="" /> )} <DropDown onClick={handleSignOut}>로그아웃</DropDown> </SignOut>
localStorage
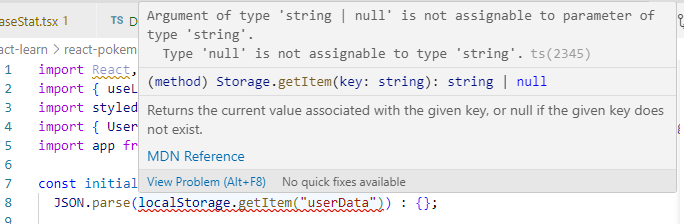
string 혹은 null이 될 수 있다.
userDataFromStorage변수에 미리 받아서 userDataFromStorage가 null이 아닐때 userDataFromStorage를 할당하면된다.userData가 User혹은 null이므로
로컬스토리지에 데이터가 없을때 null을 준다.
const userDataFromStorage = localStorage.getItem("userData"); // const initialUserData = localStorage.getItem("userData") ? // JSON.parse(localStorage.getItem("userData")) : {}; const initialUserData = userDataFromStorage ? userDataFromStorage : null;
11. .d.ts 선언 파일 생성하기
어떠한 객체가 있는데 그 객체에 유니크한 식별자를 주기 위해서 uuid라는 라이브러리를 이용해서 유니크한 값을 만들어보겠다.
uuid 설치
npm i uuid
import
import하려고했을때 에러가난다.
js파일이기때문에... 타입이 any형식이 포함된다.
해당 항목이 있는 경우 'npm i--save-dev @types/uuid'를 시도하거나,
'declare module 'uuid';' 를 포함하는 새 선언(.d.ts) 파일 추가
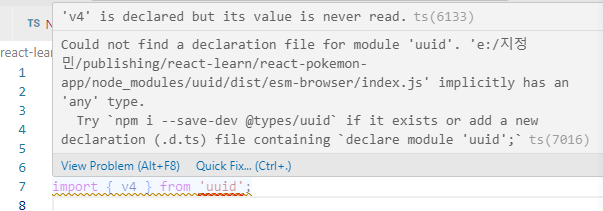
uuid.d.ts
declare module 'uuid' { const v4: () => string; export { v4 }; }
.d.ts파일은 자동으로 찾기위해서는 해당 패키지이름으로 생성해야한다.
만일 다른 이름으로 생성하였다면 참조태그를 이용한다./// <reference paht="./main.d.ts" />
실제로 .d.ts파일이 필요할때
만들어서 사용하기보다는
만들어진 파일을 사용하는것이 좋다.
선언 모듈 설치
타입선언 모듈 저장소 이동
https://github.com/DefinitelyTyped/DefinitelyTyped
여기에 왠만한 타입 모듈이 저장되어있는데
골라서 사용하면된다.
설치할때는npm install -D @types/모듈이름
모듈을 설치하면 따로 dts 파일을 선언하지 않아도된다.
uuid : npm install -D @types/uuid
dts파일은 node_modules/@types 폴더 안에 들어있는데
ts-conif.json에서 명시를 할 수 있다.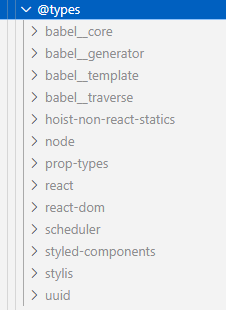
"./node_modules/@types"는 기본값이기때문에 안써도 된다.
"moduleResolution": "bundler", "allowImportingTsExtensions": true, "resolveJsonModule": true, "isolatedModules": true, "noEmit": true, "jsx": "react-jsx", "typeRoots": [ "./node_modules/@types" ],
12. localStorage wrapper 생성하기
localStorage Util 함수생성
const storage = { set: (key: string, value: any) => { localStorage.setItem(key, JSON.stringify(value)) }, get: <T>(key: string, defaultValue?: T): T => { const value = localStorage.getItem(key) return (value ? JSON.parse(value) : defaultValue) as T; }, remove: (key: string) => { localStorage.removeItem(key) } } export default storage;
NavBar 수정
Before
const userDataFromStorage = localStorage.getItem("userData"); const initialUserData = userDataFromStorage ? userDataFromStorage : null;
After
const initialUserData = storage.get<User>("userData"); ... // sign-in const handleAuth = () => { signInWithPopup(auth, provider) .then(result => { setUserData(result.user); storage.set("userData", result.user); }) .catch(error => { console.error(error); }) } // sign-out const handleSignOut = () => { signOut(auth) .then(() => { storage.remove("userData"); setUserData(null); }) .catch(error => { alert(error.massage); }) }
'Frontend > React' 카테고리의 다른 글
| [React] 헷갈리는 리액트 이벤트 핸들러 작성법 (0) | 2023.12.08 |
|---|---|
| [Firebase] 파이어베이스를 이용해서 앱 배포하기 (1) | 2023.12.08 |
| [React] 포켓몬도감 만들기7 (0) | 2023.12.08 |
| [React] 포켓몬도감 만들기6 (1) | 2023.12.08 |
| [React] 포켓몬도감 만들기5 (1) | 2023.12.08 |


