01. React Router Dom
App.jsx에서 라우팅 설정
import { BrowserRouter, Route, Routes } from 'react-router-dom'; ... <BrowserRouter> <Routes> <Route path="/" element={<MainPage />}/> <Route path="/pokemon/:id" element={<DetailPage />}/> </Routes> </BrowserRouter>
02. React Router Dom APIs
중첩라우팅(Nested Routes)
리액트 라우터의 가장 강력한 기능중 하나. 복잡한 레이아웃 코드를 어지럽힐 필요가 없다. 대부분의 레이아웃은 URL의 세그먼트에 연결되며 React Router는 이를 완전히 수용한다.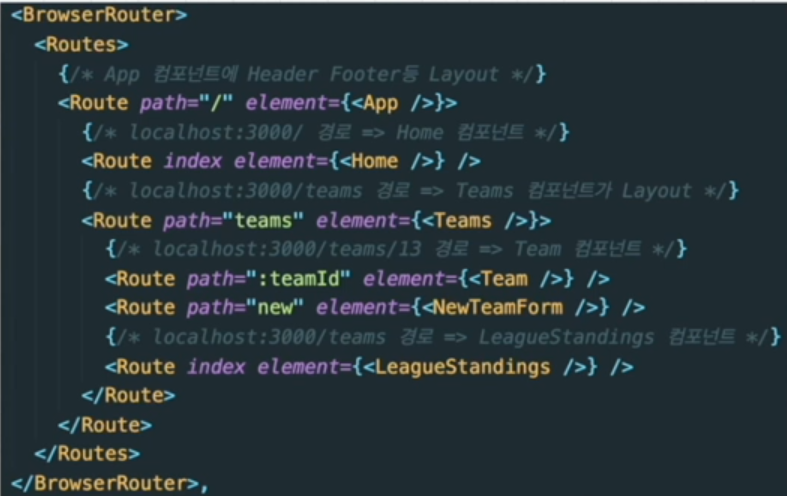
Outlet
자식 경로 요소를 렌더링하려면 부모 경로 요소에서 Outlet을 사용해야한다. 이렇게 하면 하위 경로가 렌더링될때 중첩된 UI가 표시될 수 잇다. 부모 라우트가 정확히 일치하면 자식 인덱스 라우트를 렌더링하거나 인덱스 라우트가 없으면 아무것도 렌더링하지 않습니다.
react-outer-dom에서 가져와서 사용한다.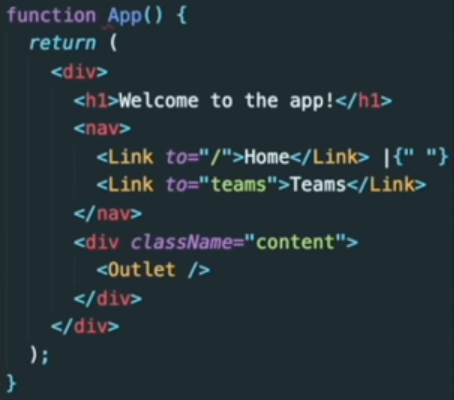
useNavigate
경로를 바꿔준다.
navigate('/home')은 localhost:3000/home으로 이동한다.
useParams
:style 문법을 path경로에 사용하였다면 useParams()로 읽을 수 있다.
url에 넣은 parameter를 반환한다.
useLocation
이 Hooks는 현재 위치 객체를 반환한다. 이것은 현재 위치가 변경될때마다 side effect를 수행하려는 경우에 유용할 수 있다.
useRoutes
<Routes>와 기능적으로 동일하지만 <Route>요소 대신 Javascript객체를 사용하여 경로를 정의한다. 이러한 객체는 일반 <Route>요소와 동일한 속성을 갖지만 JSX가 필요하지 않는다.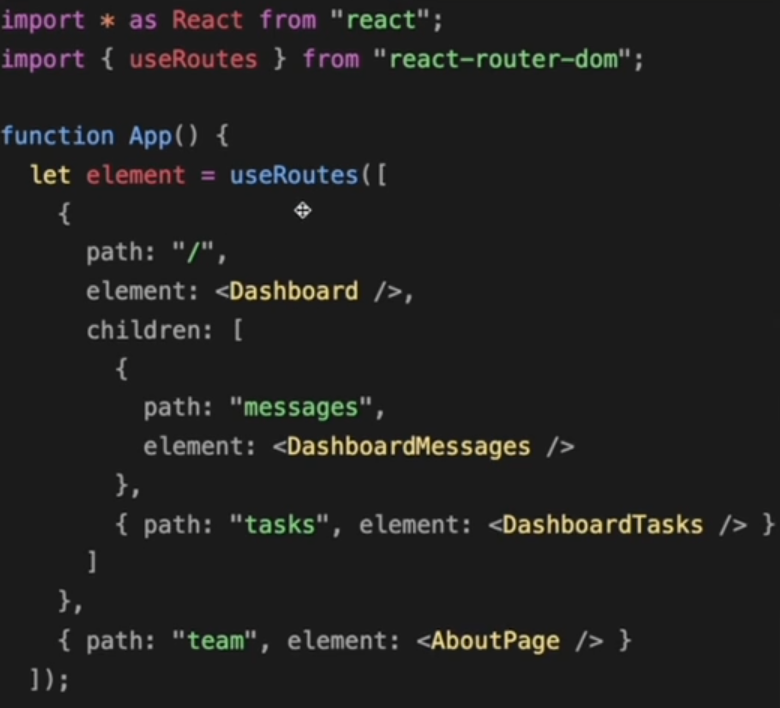
03. 포켓몬 도감 앱에 React Router Dom 적용하기
- App.jsx에서 Routes 작성
- MainPage, DetailPage 생성하고 기존 메인페이지 MainPage안에 이동
- PokeCard에서 a태그를
<Link>로 변경
04. 포켓몬 상세 페이지 데이터 생성하기
구현순서
- 필요한 데이터 API를 통해 가져오기
- 가져온 데이터 State에 보관하기
- UI 생성한 후 데이터 넣어주기
fetch로 데이터 받아오기
const DetailPage = () => { const [pokemon, setPokemon] = useState(); const params = useParams(); const pokemonId = params.id; const baseUrl = `https://pokeapi.co/api/v2/pokemon/`; useEffect(() => { fetchPokemonData() }, []); const fetchPokemonData = async () => { const url = `${baseUrl}${pokemonId}`; try { const {data: pokemonData} = await axios.get(url); console.log(pokemonData); // next, prev pokemon정보: id만 있으면되지않나? if(pokemonData) { const { name, id, types, weight, height, stats, abilities } = pokemonData; const nextAndPreviousPokemon = await getNextAndPreviousPokemon(id); console.log(stats); console.log("스탯포맷", formatPokemonStats(stats)); const formattedPokemonData = { id, name, weight: weight / 10, height: height / 10, previous: nextAndPreviousPokemon.previous, next: nextAndPreviousPokemon.next, abilities: abilities, stats: stats } } } catch(error) { console.error(error) } } const getNextAndPreviousPokemon = async (id) => { console.log("id",id) const urlPokemon = `${baseUrl}?limit=1&offset=${id - 1}`; const { data: pokemonData } = await axios.get(urlPokemon); console.log("getnextandprev...",pokemonData); const nextResponse = pokemonData.next && (await axios.get(pokemonData.next)); const previousResponse = pokemonData.previous && (await axios.get(pokemonData.previous)); return { next: nextResponse?.data?.results[0]?.name, previous: previousResponse?.data?.results[0]?.name, }; }; return ( <div>UI부분</div> ); };
05. 포켓몬 데이터 가공하기
JSON 데이터 가공하기(포맷)
먼저 JSON데이터 stats를 콘솔에 찍어서 확인한다.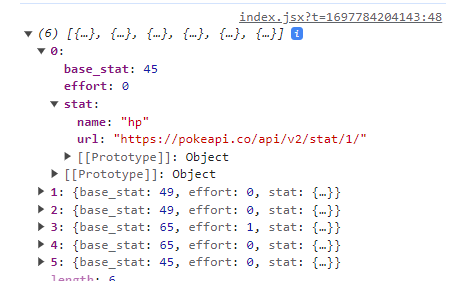
포켓몬데이터 배열에 stats 항목에 쓸 포맷함수 생성
const formatPokemonStats = ([ // stats 배열을 구조분해할당 statHP, statAttack, statDEP, statSATK, statSDEP, statSPD, ]) => [ // 배열 리턴 { name: "Hit Points", baseStat: statHP.base_stat }, { name: "Attack", baseStat: statAttack.base_stat }, { name: "Defense", baseStat: statDEP.base_stat }, { name: "Special Attack", baseStat: statSATK.base_stat }, { name: "Special Defense", baseStat: statSDEP.base_stat }, { name: "Speed", baseStat: statSPD.base_stat }, ];
데미지관계 데이터 받아오기
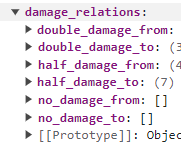
한 포켓몬이 가진 타입에 따라서
더블데미지를 주는 타입(double damage to), 더블데미지를 받는 타입(double damage from),
하프데미지를 주는 타입(half damage to), 하프데미지를 받는 타입(half damage from),
데미지를 안주는 타입(no damage to), 데미지를 안받는 타입(no damage from)
여섯가지 관계를 시각화 하는 과정이다.
그 타입에는 name과 url이 있는데 url로 그 타입의 상세정보를 가져온다.

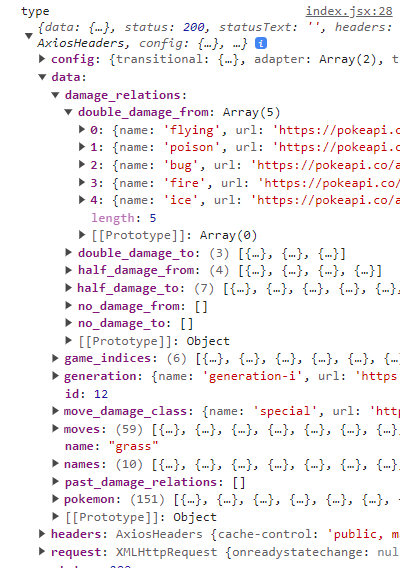
const DamageRelations = await Promise.all( // 비동기 작업 처리하고 한꺼번에 리턴 types.map(async (i) => { const type = await axios.get(i.type.url); return type.data.damage_relations }) );
fetch함수 안에서 데이터객체 받아서 포맷+생성
const fetchPokemonData = async () => { const url = `${baseUrl}${pokemonId}`; try { const {data: pokemonData} = await axios.get(url); if(pokemonData) { const { name, id, types, weight, height, stats, abilities } = pokemonData; const nextAndPreviousPokemon = await getNextAndPreviousPokemon(id); const DamageRelations = await Promise.all( // 비동기 작업 처리하고 한꺼번에 리턴 types.map(async (i) => { const type = await axios.get(i.type.url); return type.data.damage_relations }) ); const formattedPokemonData = { id, name, weight: weight / 10, height: height / 10, previous: nextAndPreviousPokemon.previous, next: nextAndPreviousPokemon.next, abilities: formatAbilities(abilities), stats: formatPokemonStats(stats), DamageRelations, }; } } catch(error) { console.error(error) } }
06. 포켓몬 상세 페이지 UI 생성하기
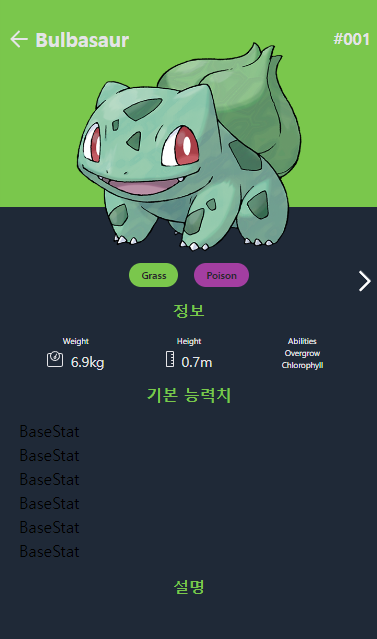
07. 포켓몬 정보 및 타입 UI 생성하기
Type
import React from 'react' const Type = ({type, damageValue}) => { const bg = `bg-${type}` return ( <div> <span className={`h-[1.5rem] py-1 px-3 rounded-2xl ${bg} font-bold text-zinc-800 text-[0.6rem] leading-[0.8rem] capitalize flex gap-1 justify-center items-center`}>{type}</span> {damageValue && <span className='bg-zinc-200/40 p-[.125rem]'>{damageValue}</span>} </div> ); } export default Type
08. BaseStat 컴포넌트 생성하기
BaseStat.jsx
const BaseStat = ({valueStat, nameStat, type}) => { const bg = `bg-${type}`; const ref = useRef(null); useEffect(()=> { const setValueStat = ref.current; // 현재 요소에 접근 const calc = valueStat * (100 / 255); setValueStat.style.width = calc + '%'; }, []) return ( <tr className="w-full text-white"> <td className="sm:px-5">{nameStat}</td> <td className="px-2 sm:px-3">{valueStat}</td> <td> <div className={ `flex items-center h-2 min-w-[10rem] overflow-hidden rounded bg-gray-600` } > <div ref={ref} className={`h-3 ${bg} `} ></div> </div> </td> <td className='px-2 sm:px-5'>255</td> </tr> ); }
09. useRef를 이용해서 변수 관리하기
useRef란?
특정 DOM을 선택할때 사용하는 React Hooks이다.
const ref = useRef(value); //{current: value} current에 value를 할당변수관리
useState를 사용해서 state가 변하면 컴포넌트가 다시 렌더링 되지만 ref를 사용하면 렌더링이 되지 않는다. (생명주기 동안 ref값은 유지가 된다.)
변수(variable)는 렌더링될때 초기화됨.
ref는 렌더링될때 값 유지된다.
useRef를 이용해서 렌더링 수를 기록하는데 쓸 수 있다. useEffect에서 종속성 배열 넣지 않으면 모든state변경시 렌더링되는데 이 안에서 ref에 기록할수있다.
10. Forward Ref에 대해서
JS에서 input에 focus를 주고싶을때 어떻게 할까?
document.getElementById("btn").addEventListner("click", () => { document.getElementById("btn").focus(); });
리액트에서 input에 focus를 주고싶을때 어떻게 할까?
const Text = () => { const inputRef = useRef(); // 1. Ref 생성 const handleClick = () => { // 3. 버튼 클릭시 focus함수 호출 inputRef.current.focuse(); } return ( <> <input ref={inputRef} /> {/* 2. ref속성에 Ref 등록 */} <button onClick={handleClick} >클릭</button> </> ) }
부모 컴포넌트에 <ChildComponent ref={ref} />로 사용하고
자녀 컴포넌트에 ref를 줄때는 어떻게 내려줄까?
ref는 예약어이기때문에 prop으로 사용할 수 없다.
이럴때는 forwardRef를 사용한다.
자녀컴포넌트를 export할때 감싸주면된다.
forwardRef는 props와 ref 인자 사용한다.
const ChildComponent = (props, ref) => { return ( <input ref={ref} /> ) } export default forwardRef(ChildComponent)
혹은 부모컴포넌트에서 다른 prop이름으로 사용해서 내려주고
자녀컴포넌트에서 ref에 사용하면된다.
'Frontend > React' 카테고리의 다른 글
| [React] 포켓몬도감 만들기6 (1) | 2023.12.08 |
|---|---|
| [React] 포켓몬도감 만들기5 (1) | 2023.12.08 |
| [React] 포켓몬도감 만들기3 (1) | 2023.12.08 |
| [React] 포켓몬도감 만들기2 (0) | 2023.12.08 |
| [React] 포켓몬도감 만들기1 (1) | 2023.12.08 |


